Wednesday 26 June 2013

Tooltime: Airbrushes, my thoughts

Airbrushes seem to be an increasing part of our hobby, especially amongst the so-called "elite" painter fraternity with a whole pile of tutorials online for them. I've owned my airbrush for about a year now, so I felt it was time to share my thoughts on this shiny toy and maybe help people who are making their minds up on owning one.


First things first, mine is the cheapest model (Neo for Iwata, sort of a legal knock-off really!) that can still be called a "proper" airbrush. That is with a double action trigger that controls both the flow of air and the flow of paint rather than a single action spraygun. A few immediate considerations:

Not cheap. My one with it's starter compressor (this deal) was £129. That is cheap for airbrushes. If you want a high end one? £300 or more just for the brush. Plus the compressor included is not good, you really want one with a tank as there is a slight pulse to the air flow without one. Expect to add about another ton to the cost to upgrade to a decent compressor. Then consider that it doesn't end there, you need thinners, isopropyl alcohol (isoprop) for cleaning... the list goes on.

Practice. Lots of the tutorials online make it seem like you can just pick the thing up and immediately get spectacular results. This is nonsense. You need to practice with one of these for a time equivalent to using a manual brush to get the same results if you are trying to paint a whole model with one. I just use it for what I call "airbrush specific" techniques. Mostly batch basecoating, weathering techniques and masked camouflage or vehicle heraldry. I wouldn't consider painting whole models with mine because...

Style. There is a particular style that the airbrush creates (if you use it to paint a whole model that is). It is a very smooth, cartoony look. Very popular, just not with me. If - like me - you appreciate the grimy, dark, realistic look (and as you read Pirate Viking Painting I kinda assume you do) then you'll only be using it for airbrush specific jobs only. Consider if you want to spend the money, especially as you can replicate most of the effects with a brush, it's just a little easier with the airbrush.

Cleaning. Urg, this is a real consideration. You have to be fastidious about cleaning these things. They suit a neat mindset, I don't have a naturally neat mind, its why I have a disciplined mind instead. It does mean that the airbrush can be a chore at times. Let me introduce you to post painting procedure:

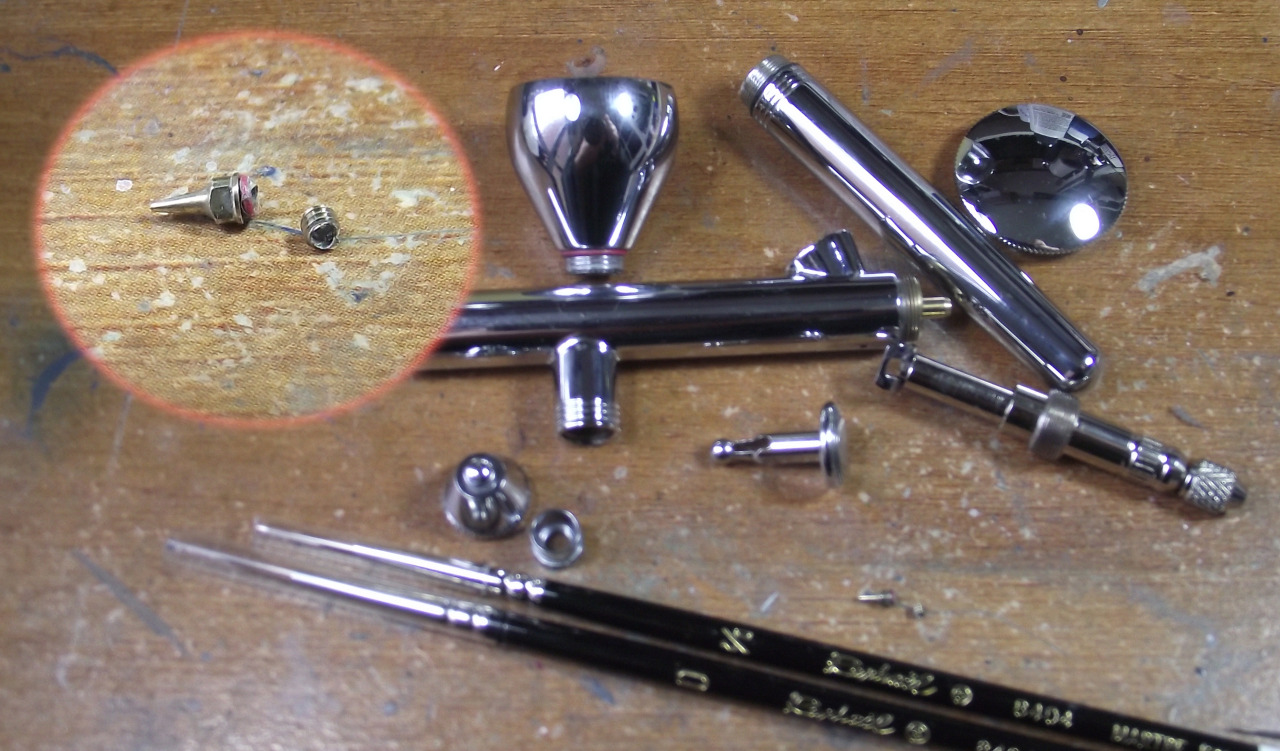
the back end has been unscrewed to expose the workings

While you are working, paint goes in part 1, you use the trigger (2) to control the air by pressing down and the paint by pulling back the trigger. This pulls the long needle (3) back and opens the tip (4) - by the way, remove this protective cap before painting, all it does is fill with paint and drip. Just put it back on when finished to protect the needle. The air hose screws in at (5) and the whole thing is held together with a screwthreaded part containing a spring (6). Between colours you need to squirt some isoprop into the cup, rub around the innards with an old brush and empty into a spare container, do this twice and then run clean isoprop through the brush until the stream is clean. Seriously, this is what you do between every colour change. Then at the end of the session (and sometimes in the middle if you do a high volume or change to a light colour) you have to strip it down and clean thoroughly or the damn thing gums shut.

note that the protective nozzle cap is gone now
First you unscrew the knurled knob at the end of the brush and extract the needle. Pull it back smoothly and straight, because if you bend it? You are done and it's about £7 to replace. Clean the needle using a kitchen towel and some isoprop. Don't remove the knob (1) entirely, I'll explain why later. Now you unscrew the mechanism from the barrel of the brush (2), if you have removed part (1) then the spring within will try to ping the mechanism apart and scatter expensive componants around the room to the sound of copious swearing. The trigger will just fall out now.


Clean out all the bits you can see with a few cotton buds (Q-tips if you are from over the pond) and more isoprop. Now we remove the nozzle, this is the part that I sheared off when retightening. That spanner is ONLY there to allow you to grip the thing, don't go any further than finger tight, it cannae take it Captain.


Now you can use a thin pipe cleaner (or in this case a rather overpriced set of "airbrush cleaning" bottle brushes of which only the thinnest of the set went through, hmm) to clean the tubes, run it a few times and rinse as it comes out of the nozzle.

Finally, reassemble the whole thing and give it a polish with a last bit of isoprop, after all that effort it is a shame if it doesn't look clean on the outside as well as the inside. This is a messy process, have copious kitchen towels and a beaker or something for excess alcohol. The whole process takes about a quarter hour. If this sounds like an unbearable drag then for the love of all that is holy do not buy an airbrush.

Mess & health: They are messy things, they create an aerosol of paint that falls as dust, also, you have to be intensely careful to mask everything as you won't believe how far this mist of paint can travel. If you don't have an extraction hood - and I don't - then you need to be masked too. A dust mask is a minimum but given some of the chemicals you will be spraying a filtering respirator is better. I forgot myself one time, used the thing for about an hour unmasked with liberal isoprop as thinner and cleaner and then got very lightheaded. I had been inhaling clouds of alcohol, see? Be ready for it and look after yourselves.

Paint: this is a choice thing. You can buy ready mixed paint perfectly suited to the airbrush but results are rather mixed.


The first pre-mixed I tried was Minitaire from Badger. Sadly, this has very, very mixed results, some are great, some - like the metallics - are bloody awful. Seriously, steer clear of anything shiny in this range. The other problem is the price, there is only one real retailer at the moment in the uk and they just convert the dollar price straight into pounds. Very overpriced. Vallejo Model Air is very good (the metallics are superb), cheaper too. But designed for military modellers, you won't easily find chapter colours for instance, that is more Minitaire's bag. You also tear through them. Airbrushes rip through paint and the thin, premixed stuff doesn't go far. My most recent attempt is using citadel acrylics thinned at a 4:5 ratio with Vallejo Airbrush thinner. The mixing bottle in the picture holds an entire thinned pot of citadel acrylics (in this case kantor blue) and thus guarantees a colour match when touching up. I think this will be my preferred method in future except metallics which Model Air will supply.

Conclusions

With all that I have said you might think that I don't think that you should own one. This isn't the case, for what it does well - those airbrush specific jobs - it is worth having. Not worth paying over the odds for (my cheapy one and teeny compressor is doing just fine) though. If you intend to get good with the thing and paint everything with one then shell out for the best you can afford at the very start. Seriously. Other people can recomend better than I if you want to become expert with this. I'll be sticking with the jobs I do with it. I've got 23:1 ratio of years experience with a manual brush vs airbrush. I'm too impatient to get the airbrush up to the same level! What I hope I have done is shown what is involved in owning and operating one of these tools. There are plenty of inspirational tutorials showing how cool they are. I just felt that you should be aware of the chores as well. Forewarned is forearmed as they say!

TTFN

Tuesday 18 June 2013

Limited Edition Death Korps Quartermaster

Avast shipmates! Remember these? They were part of my last Death Korps commission, two years ago. How time flies. Today, I've added to it:


Yup, this fine fellow is the fantastic Forgeworld event only Quartermaster. He, along with about thirty miscellaneous buddies are being added to the client's original commission. Take a moment and see how far I've come with both painting and photography in those two years by checking out the older post. One of the problems though is that none of the colours I used to paint the previous incarnation exist anymore! Fortunately, by judicious use of online comparison tables I got everything close. A few things just got swopped straight out. I used to mix a particular shade of canvas green (the mask and the puttees around his legs) which turned out to be Val Grey Green. Who knew?


It's actually made me more confident that I could match older paint schemes if I had to with the new paints. Still haven't achieved the same tone for my Blood Angels as I used to but they were a hench army to begin with. Don't think I really need to add much more in the way of infantry to that...

So with this fellow finished some of you who read "Today I have mostly been" either through the Tumblr or the Facebook/Twitter feeds will realise that I solved my brush quandry. I feel I ought to give a qualified shout out to Lawrence Arts who were the only people online in Britain who seemed to have a stock of the Raphael 8404 brushes that I prefer. Seriously, they're brushes. They take up no space whatsoever. How can people run out of them and not be able to restock for a fortnight in the 21st century? Sheesh. Anyway, Lawrence Arts are more expensive than my usual supplier and had a high P&P but by the gods they deliver fast. 17 hours from order to door. Not too shabby. Sadly, I now have to switch from the "Just In Time" supply chain for this sort of thing and move to having a backup of all my brushes so that when they wear out I'm not crippled by supply issues. This might seem a "duh" option but frankly, when brushes last 8 months to a year and take up no space at all you kinda expect them to be available to buy! Paint, yes, I have backups of that, spray too, but brushes. Grr. Never mind, expense over with... or so I thought.


Proving that these things come in threes (my 0 and 00 brushes simultaneously dying and the stockists being rubbish being the first two) take a look at the picture above. The sequin sized componant just above the brushes and magnified in the inset is the beautifully machined, precision nozzle for my airbrush. Without it it will not work. This morning while I was checking for any dirt/paint ahead of continuing work on the Titan it sheared clean off it's screw thread. I managed to extract the screw thread from the brush thank the gods but this now needs replacing too. A quick order on The Airbrush Company's web page found the part (0.35mm nozzle with O-ring if anyone cares) which comes to... Fifteen pounds. FIFTEEN QUID? It's the size of a grain of rice! (thinking about it that's probably why it's expensive Jeff, chill out).

Anyway, I've had quite a day so it was very nice to be able to have those brushes turn up right as I was in mid fury at having all productivity stopped by circumstance. A run around the block and a few cups of tea later I was calm enough to paint again and the DKK Quartermaster was a fun and rewarding model to spend the afternoon on. Aaaaand relax. So, looks like mostly DKK for the rest of the week until the new nozzle arrives. Ce la vie right?

TTFN.


Friday 14 June 2013

Workbench: Warhound 3!

Hi folks, its been a little quiet here lately which usually means that I've started something large and time consuming and this week is no exception...


Yup, I'm painting another warhound! The client saw Pyladii Alpha and Beta and wanted one of his very own. Its going to be another from the Legio Astorum too (Triarii Sinister) so I've had some practice! This week has been all about cleaning and fitting the sub assemblies and painting the interior of the torso. If you are doing one of these then seriously. Leave about two days for assembly. The legs alone take almost a day.


With the interior, I'd learned from experiance and left the torso section in fore and aft halves. Made it much easier to get the brush in. Still not easy but easier. The Val Grey-Green gives a nice "institutional paint" colour and feels like the sort of colour you paint things that aren't meant to be seen by the public. The dirt and oil around the floor give it some character and age.


The engine section is simarily cramped. You'll notice a variable quality in the painting, some it fairly clear, some just give an impressionist feel. Why? Because once the two halves are together and the connecting wall in place visability is really, really reduced.


One thing that I've adored about this model is in the roof, the grilled opening to exposed engine parts:


It's really hard to photograph well but enlarge the picture and take a look. The grill is an etched steel part that covers the resin componants beneath. It's an awesome effect and if you ever get a chance to see one of these in the flesh then check it out. Really nice.

Thats it for today, started painting the legs, more to follow!

TTFN

Tuesday 4 June 2013

Arachnaroknophobia

Greetings from a wonderfully sunny Cardiff! Just to increase the envy for anyone who has poor weather right now, my office is right next to the back door and so have basically been outside all day. Ahhhh, after the long cold spring this is a whole hell of a lot better. Only problem is that the warm weather does rather bring the bugs out...

Aaaargh! Kill it with fire!!!
And one hell of a bug it is too. This is the Arachnarok spider from the Orc & Goblin range. It. Is. Huge. Crazy big. For scale, here is a goblin in front of it.


I wanted one of these bad boys in the army from the moment they were released. They are such a lovely addition to the forest goblin range as it makes them more than just a fast cavalry choice. Those who are familiar with the model will know that it has a howdah full of forest goblins currently missing from the carapace. This is being painted separately and attached by magnets so that I can have an Arachnarok unbound as a wandering monster for scenarios. Plus, it is a pain in the behind to store with it attached! I was happy with it though so I thought I'd present first the spider itself and then the crew and howdah later. Lets talk painting. First step was research, as I have a truce with web spinning spiders (I know where they are, they don't leap out on you like the hunting spiders do) so I started with a picture of the British garden spider:


One of my philosophies when painting big monsterous stuff is that it is way, way scarier to have a really big normal creature rather than some weird red or purple thing. Hence, research. This is also the species I based the Spider Riders on. Obviously, the scheme is way to complex to perfectly replicate in painting but it gives you a place to start.


I decided to use Vallejo colours for the carapace of the Arachnarok as they have a more desaturated character. Here's the first tip, have a look at the carapace. While it is patterned, the colours hang together despite being very different. This is because all of the shades start from the same one: Val Tan Earth. That made a solid basecoat, then, by adding Val German Camo Black-Brown I apply the mid tone brown. Adding more Val GC Black-Brown I add the darker areas. The darkest areas on the tips of the limbs and the spines have black added. The paler areas are Val Deck Tan mixed with Val Tan Earth. The result is an impression that the carapace is one colour just in different shades.

I think I should apologise to arachnaphobes (rather than the arachna-uncertain like me) right about now.
For the underside and for the gaps between the limp plates I decided to go for maximum creepiness (and match the smaller spiders) and paint it pale and fleshy. Urgh. But hey, it is a monster and should look like one right?


I felt that the base - being huge, and largely uncovered by the model - needed a little work. The large plastic roots are part of the model and hold the pose of the spider. I added a trunk to give the impression of a long since fallen tree. Patches of rocks helped the parched, flinty look that I started with the other gobbos bases. Adding to that a few shrubs with clump foliage (soaked in dilute PVA to strengthen it) and painting the spiders as miniature versions of the spider rider mounts. Once it was all finished it gave a nice feeling of poor soil, maybe a reclaimed quarry (I should know, I was in one at the weekend).

And that's it for today. I'll obviously show you the crew and the howdah when it is finished. I've got a game coming up where the gobbos have their first ever outing. Should be entertaining. Once I've got the Arachnarok finished and the standard bearer it'll be roughly 1500 points. Good for a first outing.

[Edit: They kicked all kinds of Empire ass! Huzzah!]

TTFN